Step-by-Step 3 Way Switch Wiring Diagram with Power at Light - Easy Guide for Homeowners
Learn how to wire a 3-way switch with power at the light. Our diagram makes it easy to understand the process and get your switches working correctly.
If you're looking to add more convenience and flexibility to your home lighting system, a three-way switch may be just what you need. With this setup, you can control the same light fixture from two different locations, such as a hallway and a bedroom or a staircase and a living room. But how does it work? In this article, we'll walk you through the basics of three-way switch wiring diagram power at light and show you step-by-step how to install it in your home.
First, let's clarify what we mean by power at light. In this configuration, the power source comes into the light fixture first, and then travels to the switches. This is different from a power at switch setup, where the power source enters at one of the switches and then goes to the fixture. Knowing which type of wiring you have is important for choosing the right parts and connections.
Now, let's get into the nitty-gritty of three-way switch wiring. The basic concept is that you have two switches connected to the same fixture, each with a pair of wires running to it. One of these wires is called the common, and the other two are travelers. When both switches are in the same position (up or down), the circuit is either open or closed, depending on which wire is connected to the common terminal. When one switch is flipped, it changes the connection of the travelers and allows the circuit to be completed or interrupted.
To make this work, you'll need a few key components: a three-way switch, a light fixture, and some electrical cable. You'll also need to determine which wires in your existing setup are the common and travelers. This can be done with a voltage tester or by tracing the wires back to their source. Once you have everything you need, you can start the installation process.
The first step is to turn off the power to the circuit at the breaker box. This is crucial for your safety, as working with live wires can be extremely dangerous. Once you've verified that the power is off, you can remove the old switches and disconnect the wires from them. Make sure to label the wires so you know which ones go where.
Next, you'll need to run a length of cable from the light fixture to one of the switches. This cable should contain a black (hot) wire, a white (neutral) wire, and a bare (ground) wire. The black wire will connect to the common terminal on the switch, while the white and bare wires will be connected to their respective terminals. Repeat this process for the second switch, making sure to connect the common wire to the same terminal as the first switch.
Once all the connections are secure, you can turn the power back on and test the switches. If everything is working correctly, you should be able to turn the light on and off from either location. If not, you may need to double-check your wiring or consult a professional electrician.
In conclusion, three-way switch wiring diagram power at light can be a great way to add flexibility and convenience to your home lighting system. With a little bit of planning and know-how, you can install this setup yourself and enjoy the benefits of easy, versatile control over your lights.
Introduction
A 3-way switch is a type of electrical switch that enables you to control a light from two different locations. It is commonly used in hallways and staircases where two switches are needed to control a single light. In this article, we will discuss the 3-way switch wiring diagram with power at light.
What is a 3-Way Switch?
A 3-way switch has three terminals - a common terminal and two traveler terminals. The common terminal is connected to the power source, while the traveler terminals are connected to the light fixture. The travelers allow you to turn the light on or off from either switch location.
Power at Light vs Power at Switch
In a typical 3-way switch wiring diagram, the power source is usually located at one of the switch boxes. However, in some cases, the power source may be located at the light fixture instead. When the power source is at the light fixture, the wiring diagram is slightly different.
Wiring Diagram for Power at Light
The 3-way switch wiring diagram with power at light involves connecting the power source to the light fixture first. From there, a cable is run to the first switch location, and another cable is run from that switch to the second switch location. Finally, a cable is run from the second switch to the light fixture.
Step-by-Step Guide to Wiring a 3-Way Switch with Power at Light
1. Turn off the power to the circuit you will be working on.
2. Install the light fixture and connect the black wire from the fixture to the black (hot) wire from the power source. Connect the white wire from the fixture to the white (neutral) wire from the power source.
3. At the first switch location, connect the black wire from the power source to the common terminal of the switch. Connect the red and white wires from the cable running to the second switch to the traveler terminals on the switch.
4. At the second switch location, connect the black wire from the cable running to the first switch to the common terminal of the switch. Connect the red and white wires from the cable running to the light fixture to the traveler terminals on the switch.
5. Finally, connect the black wire from the cable running to the light fixture to the black wire from the power source.
Testing the Circuit
Once the wiring is complete, turn the power back on and test the circuit. Flip the switches to make sure the light turns on and off from both locations. If the light does not turn on or off, double-check the connections to make sure they are secure and properly aligned.
Conclusion
The 3-way switch wiring diagram with power at light is a bit more complex than the traditional wiring diagram with power at the switch. However, with careful attention to detail and following the steps outlined in this article, you can successfully wire a 3-way switch with power at the light fixture.
Understanding 3-Way Switch Wiring Diagram
If you want to control a single light fixture from two different locations, then 3-way switch wiring is the way to go. It involves using two switches and one light fixture, where power enters through one switch and goes out through the other. The 3-way switch wiring diagram shows how the switches are connected to the power source and the light fixture.
How Does 3-Way Switch Work?
A 3-way switch works by allowing the user to turn a light on or off from two different locations. When one switch is turned on, it sends power to the light fixture. When the second switch is turned on, it sends power to the light fixture as well, but this time, it interrupts the power from the first switch and takes over the control of the light.
Types of 3-Way Switch Wiring
There are two types of 3-way switch wiring – power through switch and power through light. In the power through switch wiring, power enters through one switch, goes through the light fixture, and exits through the second switch. In the power through light wiring, power enters through the light fixture, goes through the first switch, and exits through the second switch.
Requirements for 3-Way Switch Installation
Before you begin installing a 3-way switch, make sure that you have the right tools and materials. You will need two 3-way switches, one light fixture, electrical wires, wire nuts, a junction box, and a voltage tester. Additionally, ensure that your circuit breaker is turned off before you start working on the wiring.
How to Wire a 3-Way Switch with Power at Light
Wiring a 3-way switch with power at light is slightly more complicated than wiring it with power through switch. Here’s how you can do it:
Step 1: Turn off the circuit breaker
Before you begin the wiring process, turn off the circuit breaker connected to the switches and the light fixture. This will ensure your safety while working on the wiring.
Step 2: Install the junction box
Install the junction box for the light fixture and run a cable from it to the first switch.
Step 3: Connect the wires to the first switch
Connect the black wire from the power source to the black screw on the first switch. Connect the white wire from the power source to the white wire in the cable running to the light fixture. Finally, connect the black wire in the cable running to the light fixture to the red screw on the first switch.
Step 4: Connect the wires to the second switch
Run another cable from the first switch to the second switch and connect the black wire in the cable to the black screw on the second switch. Connect the white wire in the cable to the white wire in the cable running to the light fixture. Finally, connect the red wire in the cable running to the light fixture to the red screw on the second switch.
Step 5: Connect the wires to the light fixture
Connect the white wire from the cable running from the first switch to the white wire in the light fixture. Then, connect the black wire from the cable running from the second switch to the black wire in the light fixture.
Step 6: Test the wiring
Once you have completed the wiring, turn on the circuit breaker and test the switches and the light fixture to ensure that everything is working correctly.
Different Wire Connections in a 3-Way Switch Circuit
There are three different wire connections in a 3-way switch circuit – traveler wires, common wire, and ground wire. The traveler wires are the wires that connect the two switches together and allow power to flow between them. The common wire is the wire that carries the power to the light fixture. The ground wire provides a path for the current to flow to the ground in case of any faults or short circuits.
Testing the 3-Way Switch Wiring
After completing the wiring process, it is important to test the 3-way switch wiring to ensure that everything is working correctly. Use a voltage tester to check for the presence of electricity in the wires. If there is no electricity, then you may have a wiring issue that needs to be fixed.
Troubleshooting Common 3-Way Switch Wiring Issues
Some common issues that you may encounter while wiring a 3-way switch include reversed polarity, loose connections, and faulty switches. To fix these issues, make sure that you have connected the wires correctly, tighten any loose connections, and replace any faulty switches.
Tips for Safe and Efficient 3-Way Switch Wiring
When wiring a 3-way switch, it is important to follow safety protocols to avoid accidents and injury. Always turn off the circuit breaker before working on the wiring, use the right tools and materials, and double-check your connections before turning on the power. Additionally, make sure that you have a basic understanding of electrical wiring, and if you are unsure about any aspect of the wiring process, consult a professional electrician.
3 Way Switch Wiring Diagram Power At Light Story
The Scenario
You've just moved into your new home and you want to replace the old light switches with modern 3-way switches. You want to be able to control the same light fixture from two different locations, but you're not sure how to wire them. Fortunately, the power source is at the light fixture, so you'll be using the 3-way switch wiring diagram power at light.
The Solution
First, let's take a look at the 3-way switch wiring diagram power at light:
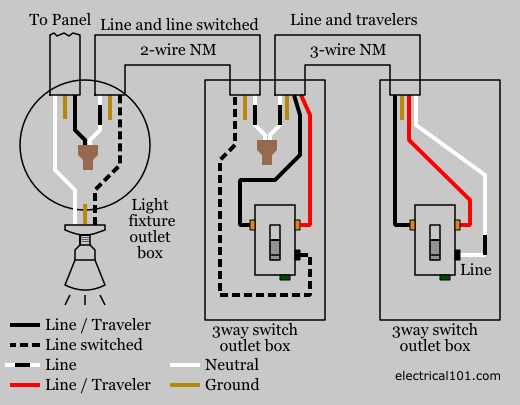
As you can see, the power source comes into the light fixture, and from there, it goes to the two 3-way switches. The black wire is the hot wire, the white wire is the neutral wire, and the red wire is the traveler wire that connects the two switches.
The Breakdown
Here's a breakdown of the 3-way switch wiring diagram power at light:
- The power source (black wire) comes into the light fixture.
- The white wire is connected to the neutral terminal in the light fixture.
- The black wire is connected to the black wire of the 3-wire cable that runs to the first 3-way switch.
- The red and white wires of the 3-wire cable are connected to the traveler terminals on the first 3-way switch.
- The black wire of the 3-wire cable is connected to the common terminal on the first 3-way switch.
- The red and white wires of another 3-wire cable are connected to the traveler terminals on the second 3-way switch.
- The black wire of the 3-wire cable is connected to the common terminal on the second 3-way switch.
- The black wire of the light fixture is connected to the common terminal on the second 3-way switch.
The Conclusion
With the 3-way switch wiring diagram power at light, you can easily control the same light fixture from two different locations. The power source coming into the light fixture makes it a little trickier, but by following the diagram and the breakdown, you should be able to wire it up in no time.
Thank You for Learning About 3 Way Switch Wiring Diagram Power At Light
Now that you have read this article on 3 way switch wiring diagram power at light, you should have a good understanding of how to wire your lighting system. Whether you are an experienced electrician or a DIY enthusiast, this guide has provided you with the necessary knowledge to take on this project.
If you are still unsure about anything, it is always best to consult with a professional electrician. They can help you with any questions you may have and ensure that your wiring is safe and up to code.
Remember, safety should always be your top priority when working with electricity. Make sure to turn off the power supply before starting any wiring work and use proper electrical tools and equipment.
One of the most important things to keep in mind when wiring your lighting system is to label all wires and switches. This will make troubleshooting much easier if something goes wrong in the future.
When wiring a 3 way switch system, it is essential to understand the difference between the common, traveler, and ground wires. If you mix up these wires, your lighting system will not work correctly.
Another critical aspect of 3 way switch wiring is to ensure that all connections are tight and secure. Loose connections can cause arcing, which can lead to fires and other hazards.
It is also important to note that the color of the wires does not always indicate their function. Always refer to the wiring diagram and manufacturer instructions to ensure that you are wiring your system correctly.
When installing your switches, make sure to follow the manufacturer's instructions carefully. Different switches may require different wiring configurations, so it is crucial to read the instructions thoroughly.
Finally, if you are not confident in your wiring abilities, it is always best to hire a professional electrician. They can ensure that your wiring is safe and up to code and provide you with peace of mind.
Thank you for reading this article on 3 way switch wiring diagram power at light. We hope that you found it informative and helpful in your lighting system project. Good luck!
People Also Ask About 3 Way Switch Wiring Diagram Power At Light
What is a 3-way switch?
A 3-way switch is a type of electrical switch that allows you to control a light or fixture from two different locations. It has three terminals, one common and two traveler terminals.
How do you wire a 3-way switch with power at the light?
If you want to wire a 3-way switch with power at the light, follow these steps:
- Turn off the power supply.
- Connect the black wire from the power source to the black wire from the light fixture using a wire nut.
- Connect the white wire from the power source to the white wire from the light fixture using a wire nut.
- Connect the black wire from the 3-way switch to the black wire from the light fixture using a wire nut.
- Connect the red and white wires from the 3-way switch to the other two wires in the electrical box where the switch is located. It doesn't matter which wire goes to which terminal on the switch.
- Turn on the power supply and test the switch.
What is the purpose of a 3-way switch?
The purpose of a 3-way switch is to allow you to control a light or fixture from two different locations. For example, if you have a hallway with two entrances, you can install a 3-way switch at each entrance so you can turn the light on or off from either location.